Створіть багатокористувацьку гру в Unity за допомогою PUN 2
Ви коли-небудь замислювалися, що потрібно, щоб створити багатокористувацьку гру в Unity?
На відміну від однокористувацьких ігор, багатокористувацькі ігри вимагають віддаленого сервера, який виконує роль моста, дозволяючи ігровим клієнтам спілкуватися один з одним.
Зараз хостингом серверів займаються численні сервіси. Одним із таких сервісів є Photon Network, який ми будемо використовувати для цього уроку.
PUN 2 — це остання версія API, яку було значно покращено порівняно зі старою версією.
У цій публікації ми розповімо про завантаження необхідних файлів, налаштування Photon AppID і програмування простого прикладу для кількох гравців.
Unity версія, використана в цьому підручнику: Unity 2018.3.0f2 (64-розрядна)
Частина 1: Налаштування PUN 2
Першим кроком є завантаження пакета PUN 2 із Asset Store. Він містить усі сценарії та файли, необхідні для багатокористувацької інтеграції.
- Відкрийте свій проект Unity, потім перейдіть до Asset Store: (Вікно -> Загальні -> AssetStore) або натисніть Ctrl+9
- Шукайте «PUN 2- Free», а потім клацніть перший результат або клацніть тут
- Імпортуйте пакет PUN 2 після завершення завантаження
![]()

- Після імпорту пакета вам потрібно створити ідентифікатор додатка Photon, це можна зробити на веб-сайті: https://www.photonengine.com/
- Створіть новий обліковий запис (або увійдіть до існуючого)
- Перейдіть на сторінку програм, натиснувши значок профілю, а потім "Your Applications" або перейдіть за цим посиланням: https://dashboard.photonengine.com/en-US/PublicCloud
- На сторінці додатків натисніть "Create new app"
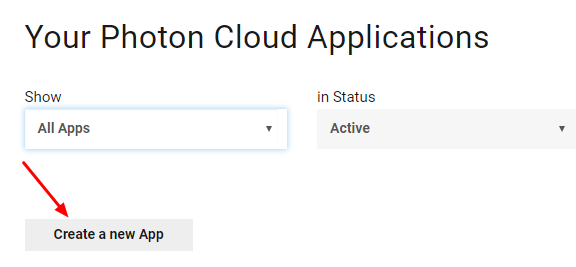
- На сторінці створення в полі Photon Type виберіть "Photon Realtime", а в полі Name введіть будь-яке ім’я та клацніть "Create"

Як бачите, за замовчуванням програма використовує безкоштовний план. Ви можете прочитати більше про тарифні плани тут
- Коли програму буде створено, скопіюйте ідентифікатор програми, розташований під назвою програми

- Поверніться до свого проекту Unity, потім перейдіть до Window -> Photon Unity Networking -> PUN Wizard
- У майстрі PUN натисніть "Setup Project", вставте свій ідентифікатор програми та натисніть "Setup Project"
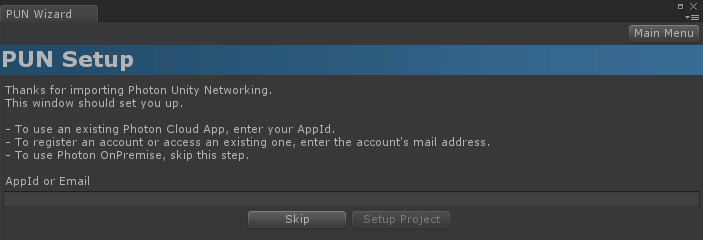
- PUN 2 готовий!
Частина 2: Створення багатокористувацької гри
Тепер давайте перейдемо до тієї частини, де ми фактично створюємо гру для кількох гравців.
Багатокористувацька гра в PUN 2 регулюється так:
- По-перше, ми підключаємось до Фотонного регіону (наприклад, Схід США, Європа, Азія тощо), який також відомий як лобі.
- Опинившись у лобі, ми запитуємо всі кімнати, створені в регіоні, а потім можемо або приєднатися до однієї з кімнат, або створити власну кімнату.
- Після приєднання до кімнати ми запитуємо список гравців, підключених до кімнати, і створюємо їхні екземпляри Player, які потім синхронізуються з їхніми локальними екземплярами через PhotonView.
- Коли хтось залишає кімнату, його екземпляр знищується, і він видаляється зі списку гравців.
1. Облаштування лобі
Почнемо зі створення сцени лобі, яка міститиме логіку лобі (перегляд існуючих кімнат, створення нових кімнат тощо):
- Створіть новий сценарій C# і назвіть його PUN2_GameLobby
- Створіть нову сцену та назвіть її "GameLobby"
- У сцені GameLobby створіть новий GameObject. Назвіть його "_GameLobby" і призначте йому сценарій PUN2_GameLobby
Тепер відкрийте скрипт PUN2_GameLobby:
Спочатку ми імпортуємо простори імен Photon, додаючи рядки нижче на початку сценарію:
using Photon.Pun;
using Photon.Realtime;
Крім того, перш ніж продовжити, нам потрібно замінити MonoBehaviour за замовчуванням на MonoBehaviourPunCallbacks. Цей крок необхідний, щоб мати можливість використовувати зворотні виклики Photon:
public class PUN2_GameLobby : MonoBehaviourPunCallbacksДалі створюємо необхідні змінні:
    //Our player name
    string playerName = "Player 1";
    //Users are separated from each other by gameversion (which allows you to make breaking changes).
    string gameVersion = "0.9";
    //The list of created rooms
    List<RoomInfo> createdRooms = new List<RoomInfo>();
    //Use this name when creating a Room
    string roomName = "Room 1";
    Vector2 roomListScroll = Vector2.zero;
    bool joiningRoom = false;
Потім ми викликаємо ConnectUsingSettings() у пустому Start(). Це означає, що як тільки гра відкривається, вона підключається до сервера Photon:
    // Use this for initialization
    void Start()
    {
        //This makes sure we can use PhotonNetwork.LoadLevel() on the master client and all clients in the same room sync their level automatically
        PhotonNetwork.AutomaticallySyncScene = true;

        if (!PhotonNetwork.IsConnected)
        {
            //Set the App version before connecting
            PhotonNetwork.PhotonServerSettings.AppSettings.AppVersion = gameVersion;
            // Connect to the photon master-server. We use the settings saved in PhotonServerSettings (a .asset file in this project)
            PhotonNetwork.ConnectUsingSettings();
        }
    }
Щоб дізнатися, чи було підключення до Photon успішним, нам потрібно реалізувати такі зворотні виклики: OnDisconnected(DisconnectCause cause), OnConnectedToMaster(), OnRoomListUpdate(List<RoomInfo> roomList)
public override void OnDisconnected(DisconnectCause cause)
{
Debug.Log("OnFailedToConnectToPhoton. StatusCode: " + cause.ToString() + " ServerAddress: " + PhotonNetwork.ServerAddress);
}
public override void OnConnectedToMaster()
{
Debug.Log("OnConnectedToMaster");
//After we connected to Master server, join the Lobby
PhotonNetwork.JoinLobby(TypedLobby.Default);
}
public override void OnRoomListUpdate(List<RoomInfo> roomList)
{
Debug.Log("We have received the Room list");
//After this callback, update the room list
createdRooms = roomList;
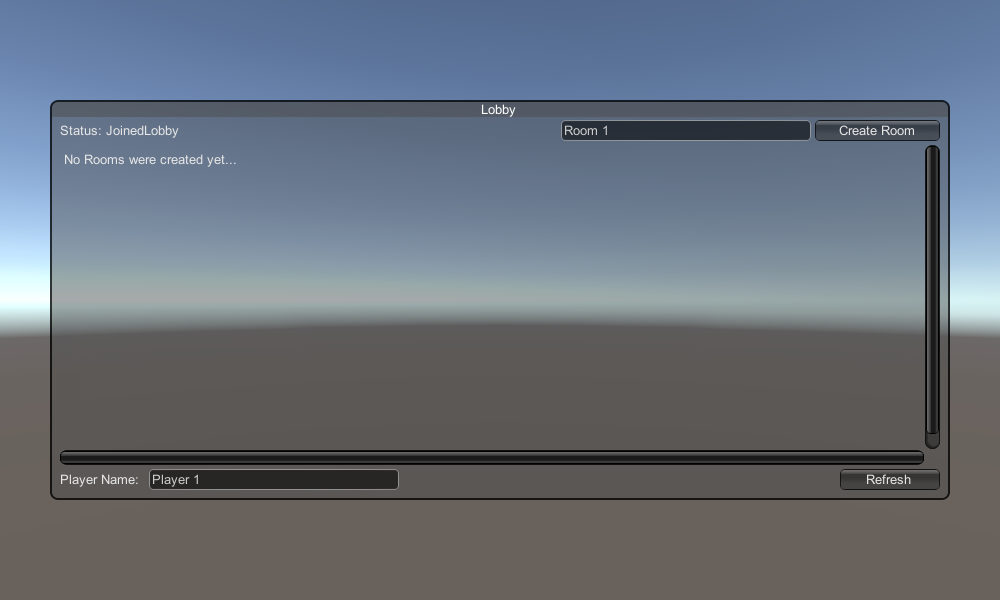
}Далі йде частина інтерфейсу користувача, де виконується перегляд кімнати та створення кімнати:
    void OnGUI()
    {
        GUI.Window(0, new Rect(Screen.width / 2 - 450, Screen.height / 2 - 200, 900, 400), LobbyWindow, "Lobby");
    }

    void LobbyWindow(int index)
    {
        //Connection Status and Room creation Button
        GUILayout.BeginHorizontal();

        GUILayout.Label("Status: " + PhotonNetwork.NetworkClientState);

        if (joiningRoom || !PhotonNetwork.IsConnected || PhotonNetwork.NetworkClientState != ClientState.JoinedLobby)
        {
            GUI.enabled = false;
        }

        GUILayout.FlexibleSpace();

        //Room name text field
        roomName = GUILayout.TextField(roomName, GUILayout.Width(250));

        if (GUILayout.Button("Create Room", GUILayout.Width(125)))
        {
            if (roomName != "")
            {
                joiningRoom = true;

                RoomOptions roomOptions = new RoomOptions();
                roomOptions.IsOpen = true;
                roomOptions.IsVisible = true;
                roomOptions.MaxPlayers = (byte)10; //Set any number

                PhotonNetwork.JoinOrCreateRoom(roomName, roomOptions, TypedLobby.Default);
            }
        }

        GUILayout.EndHorizontal();

        //Scroll through available rooms
        roomListScroll = GUILayout.BeginScrollView(roomListScroll, true, true);

        if (createdRooms.Count == 0)
        {
            GUILayout.Label("No Rooms were created yet...");
        }
        else
        {
            for (int i = 0; i < createdRooms.Count; i++)
            {
                GUILayout.BeginHorizontal("box");
                GUILayout.Label(createdRooms[i].Name, GUILayout.Width(400));
                GUILayout.Label(createdRooms[i].PlayerCount + "/" + createdRooms[i].MaxPlayers);

                GUILayout.FlexibleSpace();

                if (GUILayout.Button("Join Room"))
                {
                    joiningRoom = true;

                    //Set our Player name
                    PhotonNetwork.NickName = playerName;

                    //Join the Room
                    PhotonNetwork.JoinRoom(createdRooms[i].Name);
                }
                GUILayout.EndHorizontal();
            }
        }

        GUILayout.EndScrollView();

        //Set player name and Refresh Room button
        GUILayout.BeginHorizontal();

        GUILayout.Label("Player Name: ", GUILayout.Width(85));
        //Player name text field
        playerName = GUILayout.TextField(playerName, GUILayout.Width(250));

        GUILayout.FlexibleSpace();

        GUI.enabled = (PhotonNetwork.NetworkClientState == ClientState.JoinedLobby || PhotonNetwork.NetworkClientState == ClientState.Disconnected) && !joiningRoom;
        if (GUILayout.Button("Refresh", GUILayout.Width(100)))
        {
            if (PhotonNetwork.IsConnected)
            {
                //Re-join Lobby to get the latest Room list
                PhotonNetwork.JoinLobby(TypedLobby.Default);
            }
            else
            {
                //We are not connected, estabilish a new connection
                PhotonNetwork.ConnectUsingSettings();
            }
        }

        GUILayout.EndHorizontal();

        if (joiningRoom)
        {
            GUI.enabled = true;
            GUI.Label(new Rect(900 / 2 - 50, 400 / 2 - 10, 100, 20), "Connecting...");
        }
    }
І, нарешті, ми реалізуємо ще 4 зворотні виклики: OnCreateRoomFailed(короткий returnCode, рядкове повідомлення), OnJoinRoomFailed(короткий returnCode, рядкове повідомлення), OnCreatedRoom() і OnJoinedRoom().
Ці зворотні виклики використовуються, щоб визначити, чи ми приєдналися/створили кімнату, чи виникли якісь проблеми під час підключення.
Ось останній сценарій PUN2_GameLobby.cs:
using System.Collections.Generic;
using UnityEngine;
using Photon.Pun;
using Photon.Realtime;

public class PUN2_GameLobby : MonoBehaviourPunCallbacks
{

    //Our player name
    string playerName = "Player 1";
    //Users are separated from each other by gameversion (which allows you to make breaking changes).
    string gameVersion = "0.9";
    //The list of created rooms
    List<RoomInfo> createdRooms = new List<RoomInfo>();
    //Use this name when creating a Room
    string roomName = "Room 1";
    Vector2 roomListScroll = Vector2.zero;
    bool joiningRoom = false;

    // Use this for initialization
    void Start()
    {
        //This makes sure we can use PhotonNetwork.LoadLevel() on the master client and all clients in the same room sync their level automatically
        PhotonNetwork.AutomaticallySyncScene = true;

        if (!PhotonNetwork.IsConnected)
        {
            //Set the App version before connecting
            PhotonNetwork.PhotonServerSettings.AppSettings.AppVersion = gameVersion;
            // Connect to the photon master-server. We use the settings saved in PhotonServerSettings (a .asset file in this project)
            PhotonNetwork.ConnectUsingSettings();
        }
    }

    public override void OnDisconnected(DisconnectCause cause)
    {
        Debug.Log("OnFailedToConnectToPhoton. StatusCode: " + cause.ToString() + " ServerAddress: " + PhotonNetwork.ServerAddress);
    }

    public override void OnConnectedToMaster()
    {
        Debug.Log("OnConnectedToMaster");
        //After we connected to Master server, join the Lobby
        PhotonNetwork.JoinLobby(TypedLobby.Default);
    }

    public override void OnRoomListUpdate(List<RoomInfo> roomList)
    {
        Debug.Log("We have received the Room list");
        //After this callback, update the room list
        createdRooms = roomList;
    }

    void OnGUI()
    {
        GUI.Window(0, new Rect(Screen.width / 2 - 450, Screen.height / 2 - 200, 900, 400), LobbyWindow, "Lobby");
    }

    void LobbyWindow(int index)
    {
        //Connection Status and Room creation Button
        GUILayout.BeginHorizontal();

        GUILayout.Label("Status: " + PhotonNetwork.NetworkClientState);

        if (joiningRoom || !PhotonNetwork.IsConnected || PhotonNetwork.NetworkClientState != ClientState.JoinedLobby)
        {
            GUI.enabled = false;
        }

        GUILayout.FlexibleSpace();

        //Room name text field
        roomName = GUILayout.TextField(roomName, GUILayout.Width(250));

        if (GUILayout.Button("Create Room", GUILayout.Width(125)))
        {
            if (roomName != "")
            {
                joiningRoom = true;

                RoomOptions roomOptions = new RoomOptions();
                roomOptions.IsOpen = true;
                roomOptions.IsVisible = true;
                roomOptions.MaxPlayers = (byte)10; //Set any number

                PhotonNetwork.JoinOrCreateRoom(roomName, roomOptions, TypedLobby.Default);
            }
        }

        GUILayout.EndHorizontal();

        //Scroll through available rooms
        roomListScroll = GUILayout.BeginScrollView(roomListScroll, true, true);

        if (createdRooms.Count == 0)
        {
            GUILayout.Label("No Rooms were created yet...");
        }
        else
        {
            for (int i = 0; i < createdRooms.Count; i++)
            {
                GUILayout.BeginHorizontal("box");
                GUILayout.Label(createdRooms[i].Name, GUILayout.Width(400));
                GUILayout.Label(createdRooms[i].PlayerCount + "/" + createdRooms[i].MaxPlayers);

                GUILayout.FlexibleSpace();

                if (GUILayout.Button("Join Room"))
                {
                    joiningRoom = true;

                    //Set our Player name
                    PhotonNetwork.NickName = playerName;

                    //Join the Room
                    PhotonNetwork.JoinRoom(createdRooms[i].Name);
                }
                GUILayout.EndHorizontal();
            }
        }

        GUILayout.EndScrollView();

        //Set player name and Refresh Room button
        GUILayout.BeginHorizontal();

        GUILayout.Label("Player Name: ", GUILayout.Width(85));
        //Player name text field
        playerName = GUILayout.TextField(playerName, GUILayout.Width(250));

        GUILayout.FlexibleSpace();

        GUI.enabled = (PhotonNetwork.NetworkClientState == ClientState.JoinedLobby || PhotonNetwork.NetworkClientState == ClientState.Disconnected) && !joiningRoom;
        if (GUILayout.Button("Refresh", GUILayout.Width(100)))
        {
            if (PhotonNetwork.IsConnected)
            {
                //Re-join Lobby to get the latest Room list
                PhotonNetwork.JoinLobby(TypedLobby.Default);
            }
            else
            {
                //We are not connected, estabilish a new connection
                PhotonNetwork.ConnectUsingSettings();
            }
        }

        GUILayout.EndHorizontal();

        if (joiningRoom)
        {
            GUI.enabled = true;
            GUI.Label(new Rect(900 / 2 - 50, 400 / 2 - 10, 100, 20), "Connecting...");
        }
    }

    public override void OnCreateRoomFailed(short returnCode, string message)
    {
        Debug.Log("OnCreateRoomFailed got called. This can happen if the room exists (even if not visible). Try another room name.");
        joiningRoom = false;
    }

    public override void OnJoinRoomFailed(short returnCode, string message)
    {
        Debug.Log("OnJoinRoomFailed got called. This can happen if the room is not existing or full or closed.");
        joiningRoom = false;
    }

    public override void OnJoinRandomFailed(short returnCode, string message)
    {
        Debug.Log("OnJoinRandomFailed got called. This can happen if the room is not existing or full or closed.");
        joiningRoom = false;
    }

    public override void OnCreatedRoom()
    {
        Debug.Log("OnCreatedRoom");
        //Set our player name
        PhotonNetwork.NickName = playerName;
        //Load the Scene called GameLevel (Make sure it's added to build settings)
        PhotonNetwork.LoadLevel("GameLevel");
    }

    public override void OnJoinedRoom()
    {
        Debug.Log("OnJoinedRoom");
    }
}
2. Створення префабу Player
У багатокористувацьких іграх екземпляр гравця має 2 сторони: локальну та віддалену
Локальний екземпляр контролюється локально (нами).
Віддалений екземпляр, з іншого боку, є локальним представленням того, що робить інший гравець. Наш внесок не повинен впливати на нього.
Щоб визначити, чи є примірник локальним чи віддаленим, ми використовуємо компонент PhotonView.
PhotonView діє як месенджер, який отримує та надсилає значення, які потрібно синхронізувати, наприклад положення та обертання.
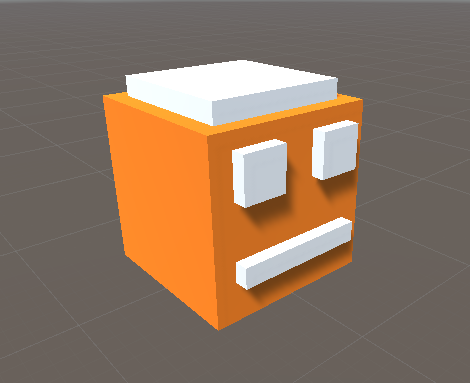
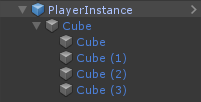
Отже, почнемо зі створення примірника програвача (якщо у вас уже є готовий примірник програвача, ви можете пропустити цей крок).
У моєму випадку екземпляр Player буде простим кубом, який переміщується за допомогою клавіш W і S і повертається за допомогою клавіш A і D.
Ось простий скрипт контролера:
SimplePlayerController.cs
using UnityEngine;

public class SimplePlayerController : MonoBehaviour
{

    // Update is called once per frame
    void Update()
    {
        //Move Front/Back
        if (Input.GetKey(KeyCode.W))
        {
            transform.Translate(transform.forward * Time.deltaTime * 2.45f, Space.World);
        }
        else if (Input.GetKey(KeyCode.S))
        {
            transform.Translate(-transform.forward * Time.deltaTime * 2.45f, Space.World);
        }

        //Rotate Left/Right
        if (Input.GetKey(KeyCode.A))
        {
            transform.Rotate(new Vector3(0, -14, 0) * Time.deltaTime * 4.5f, Space.Self);
        }
        else if (Input.GetKey(KeyCode.D))
        {
            transform.Rotate(new Vector3(0, 14, 0) * Time.deltaTime * 4.5f, Space.Self);
        }
    }
}
Наступним кроком буде додавання компонента PhotonView.
- Додайте компонент PhotonView до екземпляра Player.
- Створіть новий сценарій C# і назвіть його PUN2_PlayerSync (цей сценарій використовуватиметься для спілкування через PhotonView).
Відкрийте сценарій PUN2_PlayerSync:
У PUN2_PlayerSync перше, що нам потрібно зробити, це додати простір імен Photon.Pun і замінити MonoBehaviour на MonoBehaviourPun, а також додати інтерфейс IPunObservable.
MonoBehaviourPun необхідний, щоб мати можливість використовувати кешовану змінну photonView замість GetComponent<PhotonView>().
using UnityEngine;
using Photon.Pun;

public class PUN2_PlayerSync : MonoBehaviourPun, IPunObservable
Після цього ми можемо перейти до створення всіх необхідних змінних:
    //List of the scripts that should only be active for the local player (ex. PlayerController, MouseLook etc.)
    public MonoBehaviour[] localScripts;
    //List of the GameObjects that should only be active for the local player (ex. Camera, AudioListener etc.)
    public GameObject[] localObjects;
    //Values that will be synced over network
    Vector3 latestPos;
    Quaternion latestRot;
Потім у void Start() ми перевіряємо, чи є програвач локальним чи віддаленим за допомогою photonView.IsMine:
    // Use this for initialization
    void Start()
    {
        if (photonView.IsMine)
        {
            //Player is local
        }
        else
        {
            //Player is Remote, deactivate the scripts and object that should only be enabled for the local player
            for (int i = 0; i < localScripts.Length; i++)
            {
                localScripts[i].enabled = false;
            }
            for (int i = 0; i < localObjects.Length; i++)
            {
                localObjects[i].SetActive(false);
            }
        }
    }
Фактична синхронізація виконується через зворотний виклик PhotonView: OnPhotonSerializeView(PhotonStream stream, PhotonMessageInfo info):
    public void OnPhotonSerializeView(PhotonStream stream, PhotonMessageInfo info)
    {
        if (stream.IsWriting)
        {
            //We own this player: send the others our data
            stream.SendNext(transform.position);
            stream.SendNext(transform.rotation);
        }
        else
        {
            //Network player, receive data
            latestPos = (Vector3)stream.ReceiveNext();
            latestRot = (Quaternion)stream.ReceiveNext();
        }
    }
У цьому випадку ми надсилаємо гравцеві лише позицію та обертання, але ви можете використати приклад вище, щоб надіслати будь-яке значення, яке потрібно синхронізувати через мережу, з високою частотою.
Отримані значення потім застосовуються в void Update():
    // Update is called once per frame
    void Update()
    {
        if (!photonView.IsMine)
        {
            //Update remote player (smooth this, this looks good, at the cost of some accuracy)
            transform.position = Vector3.Lerp(transform.position, latestPos, Time.deltaTime * 5);
            transform.rotation = Quaternion.Lerp(transform.rotation, latestRot, Time.deltaTime * 5);
        }
    }
}
Ось останній сценарій PUN2_PlayerSync.cs:
using UnityEngine;
using Photon.Pun;

public class PUN2_PlayerSync : MonoBehaviourPun, IPunObservable
{

    //List of the scripts that should only be active for the local player (ex. PlayerController, MouseLook etc.)
    public MonoBehaviour[] localScripts;
    //List of the GameObjects that should only be active for the local player (ex. Camera, AudioListener etc.)
    public GameObject[] localObjects;
    //Values that will be synced over network
    Vector3 latestPos;
    Quaternion latestRot;

    // Use this for initialization
    void Start()
    {
        if (photonView.IsMine)
        {
            //Player is local
        }
        else
        {
            //Player is Remote, deactivate the scripts and object that should only be enabled for the local player
            for (int i = 0; i < localScripts.Length; i++)
            {
                localScripts[i].enabled = false;
            }
            for (int i = 0; i < localObjects.Length; i++)
            {
                localObjects[i].SetActive(false);
            }
        }
    }

    public void OnPhotonSerializeView(PhotonStream stream, PhotonMessageInfo info)
    {
        if (stream.IsWriting)
        {
            //We own this player: send the others our data
            stream.SendNext(transform.position);
            stream.SendNext(transform.rotation);
        }
        else
        {
            //Network player, receive data
            latestPos = (Vector3)stream.ReceiveNext();
            latestRot = (Quaternion)stream.ReceiveNext();
        }
    }

    // Update is called once per frame
    void Update()
    {
        if (!photonView.IsMine)
        {
            //Update remote player (smooth this, this looks good, at the cost of some accuracy)
            transform.position = Vector3.Lerp(transform.position, latestPos, Time.deltaTime * 5);
            transform.rotation = Quaternion.Lerp(transform.rotation, latestRot, Time.deltaTime * 5);
        }
    }
}
Тепер давайте призначимо щойно створений сценарій:
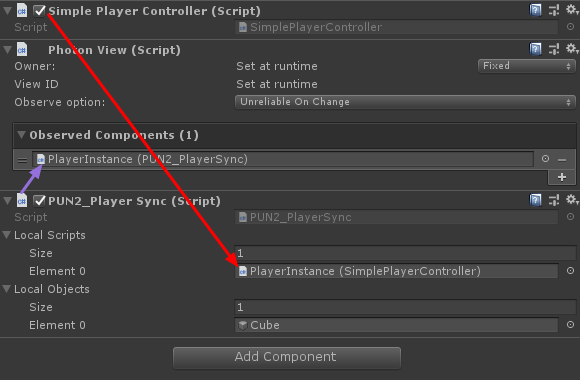
- Прикріпіть сценарій PUN2_PlayerSync до PlayerInstance.
- Перетягніть PUN2_PlayerSync у спостережувані компоненти PhotonView.
- Призначте SimplePlayerController "Local Scripts" і призначте GameObjects (які потрібно вимкнути для віддалених гравців) до "Local Objects"
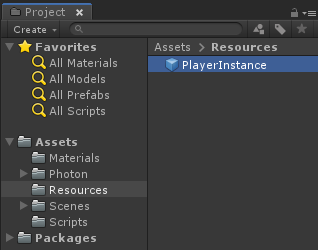
- Збережіть PlayerInstance у Prefab і перемістіть його до папки Resources (якщо такої папки немає, створіть її). Цей крок необхідний, щоб мати можливість створювати багатокористувацькі об’єкти через мережу.
3. Створення ігрового рівня
GameLevel — це сцена, яка завантажується після приєднання до кімнати, і саме там відбуваються всі дії.
- Створіть нову сцену та назвіть її "GameLevel" (Або, якщо ви хочете зберегти іншу назву, не забудьте змінити назву в цьому рядку PhotonNetwork.LoadLevel("GameLevel"); у PUN2_GameLobby.cs).
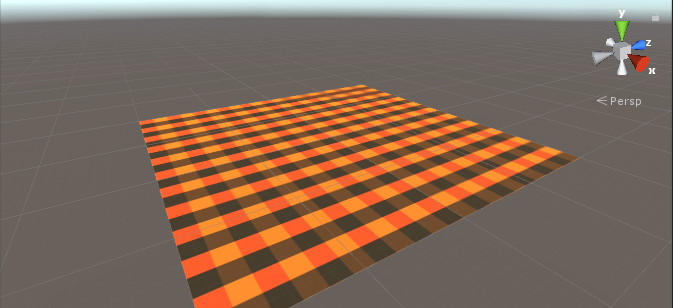
У моєму випадку я буду використовувати просту сцену з літаком:
- Тепер створіть новий сценарій і назвіть його PUN2_RoomController (цей сценарій оброблятиме логіку в кімнаті, як-от створення гравців, показ списку гравців тощо).
Відкрийте сценарій PUN2_RoomController:
Як і PUN2_GameLobby, ми починаємо з додавання просторів імен Photon і заміни MonoBehaviour на MonoBehaviourPunCallbacks:
using UnityEngine;
using Photon.Pun;

public class PUN2_RoomController : MonoBehaviourPunCallbacks
Тепер додамо необхідні змінні:
    //Player instance prefab, must be located in the Resources folder
    public GameObject playerPrefab;
    //Player spawn point
    public Transform spawnPoint;
Щоб створити префаб Player, ми використовуємо PhotonNetwork.Instantiate:
    // Use this for initialization
    void Start()
    {
        //In case we started this demo with the wrong scene being active, simply load the menu scene
        if (PhotonNetwork.CurrentRoom == null)
        {
            Debug.Log("Is not in the room, returning back to Lobby");
            UnityEngine.SceneManagement.SceneManager.LoadScene("GameLobby");
            return;
        }

        //We're in a room. spawn a character for the local player. it gets synced by using PhotonNetwork.Instantiate
        PhotonNetwork.Instantiate(playerPrefab.name, spawnPoint.position, Quaternion.identity, 0);
    }
І простий інтерфейс користувача з кнопкою "Leave Room" і деякими додатковими елементами, такими як назва кімнати та список підключених гравців:
    void OnGUI()
    {
        if (PhotonNetwork.CurrentRoom == null)
            return;

        //Leave this Room
        if (GUI.Button(new Rect(5, 5, 125, 25), "Leave Room"))
        {
            PhotonNetwork.LeaveRoom();
        }

        //Show the Room name
        GUI.Label(new Rect(135, 5, 200, 25), PhotonNetwork.CurrentRoom.Name);

        //Show the list of the players connected to this Room
        for (int i = 0; i < PhotonNetwork.PlayerList.Length; i++)
        {
            //Show if this player is a Master Client. There can only be one Master Client per Room so use this to define the authoritative logic etc.)
            string isMasterClient = (PhotonNetwork.PlayerList[i].IsMasterClient ? ": MasterClient" : "");
            GUI.Label(new Rect(5, 35 + 30 * i, 200, 25), PhotonNetwork.PlayerList[i].NickName + isMasterClient);
        }
    }
Нарешті, ми реалізуємо ще один зворотний виклик PhotonNetwork під назвою OnLeftRoom(), який викликається, коли ми залишаємо кімнату:
    public override void OnLeftRoom()
    {
        //We have left the Room, return back to the GameLobby
        UnityEngine.SceneManagement.SceneManager.LoadScene("GameLobby");
    }
Ось остаточний сценарій PUN2_RoomController.cs:
using UnityEngine;
using Photon.Pun;

public class PUN2_RoomController : MonoBehaviourPunCallbacks
{

    //Player instance prefab, must be located in the Resources folder
    public GameObject playerPrefab;
    //Player spawn point
    public Transform spawnPoint;

    // Use this for initialization
    void Start()
    {
        //In case we started this demo with the wrong scene being active, simply load the menu scene
        if (PhotonNetwork.CurrentRoom == null)
        {
            Debug.Log("Is not in the room, returning back to Lobby");
            UnityEngine.SceneManagement.SceneManager.LoadScene("GameLobby");
            return;
        }

        //We're in a room. spawn a character for the local player. it gets synced by using PhotonNetwork.Instantiate
        PhotonNetwork.Instantiate(playerPrefab.name, spawnPoint.position, Quaternion.identity, 0);
    }

    void OnGUI()
    {
        if (PhotonNetwork.CurrentRoom == null)
            return;

        //Leave this Room
        if (GUI.Button(new Rect(5, 5, 125, 25), "Leave Room"))
        {
            PhotonNetwork.LeaveRoom();
        }

        //Show the Room name
        GUI.Label(new Rect(135, 5, 200, 25), PhotonNetwork.CurrentRoom.Name);

        //Show the list of the players connected to this Room
        for (int i = 0; i < PhotonNetwork.PlayerList.Length; i++)
        {
            //Show if this player is a Master Client. There can only be one Master Client per Room so use this to define the authoritative logic etc.)
            string isMasterClient = (PhotonNetwork.PlayerList[i].IsMasterClient ? ": MasterClient" : "");
            GUI.Label(new Rect(5, 35 + 30 * i, 200, 25), PhotonNetwork.PlayerList[i].NickName + isMasterClient);
        }
    }

    public override void OnLeftRoom()
    {
        //We have left the Room, return back to the GameLobby
        UnityEngine.SceneManagement.SceneManager.LoadScene("GameLobby");
    }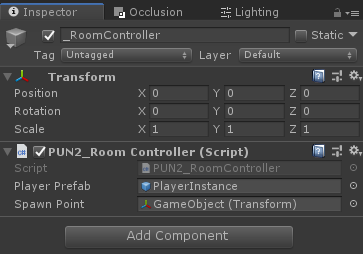
}- Створіть новий GameObject у сцені 'GameLevel' і назвіть його "_RoomController"
- Приєднайте сценарій PUN2_RoomController до об’єкта _RoomController
- Призначте префаб PlayerInstance і трансформацію SpawnPoint, а потім збережіть сцену
- Додайте MainMenu та GameLevel до налаштувань збірки.

4. Створення тестової збірки
Тепер настав час створити збірку та протестувати її:
Все працює як очікувалося!
Бонус
RPC
У PUN 2 RPC означає Remote Procedure Call, він використовується для виклику функції на віддалених клієнтах, які знаходяться в одній кімнаті (ви можете прочитати більше про це тут).
RPC мають багато застосувань, наприклад, скажімо, вам потрібно надіслати повідомлення чату всім гравцям у кімнаті. З RPC це легко зробити:
[PunRPC]
void ChatMessage(string senderName, string messageText)
{
    Debug.Log(string.Format("{0}: {1}", senderName, messageText));
}
Зверніть увагу на [PunRPC] перед функцією. Цей атрибут необхідний, якщо ви плануєте викликати функцію через RPC.
Щоб викликати функції, позначені як RPC, вам потрібен PhotonView. Приклад виклику:
PhotonView photonView = PhotonView.Get(this);
photonView.RPC("ChatMessage", RpcTarget.All, PhotonNetwork.playerName, "Some message");
Порада: якщо ви заміните MonoBehaviour у своєму сценарії на MonoBehaviourPun або MonoBehaviourPunCallbacks, ви можете пропустити PhotonView.Get() і використовувати photonView.RPC() безпосередньо.
Спеціальні властивості
У PUN 2 спеціальні властивості — це хеш-таблиця, яку можна призначити гравцеві або кімнаті.
Це корисно, коли вам потрібно встановити постійні дані, які не потрібно часто змінювати (наприклад, назва команди гравця, ігровий режим кімнати тощо).
Спочатку вам потрібно визначити хеш-таблицю, що робиться додаванням рядка нижче на початку сценарію:
//Replace default Hashtables with Photon hashtables
using Hashtable = ExitGames.Client.Photon.Hashtable;
У наведеному нижче прикладі встановлюються властивості кімнати під назвою "GameMode" і "AnotherProperty":
        //Set Room properties (Only Master Client is allowed to set Room properties)
        if (PhotonNetwork.IsMasterClient)
        {
            Hashtable setRoomProperties = new Hashtable();
            setRoomProperties.Add("GameMode", "FFA");
            setRoomProperties.Add("AnotherProperty", "Test");
            PhotonNetwork.CurrentRoom.SetCustomProperties(setRoomProperties);
        }

        //Will print "FFA"
        print((string)PhotonNetwork.CurrentRoom.CustomProperties["GameMode"]);
        //Will print "Test"
        print((string)PhotonNetwork.CurrentRoom.CustomProperties["AnotherProperty"]);
Властивості гравця налаштовуються аналогічно:
            Hashtable setPlayerProperties = new Hashtable();
            setPlayerProperties.Add("PlayerHP", (float)100);
            PhotonNetwork.LocalPlayer.SetCustomProperties(setPlayerProperties);

            print((float)PhotonNetwork.LocalPlayer.CustomProperties["PlayerHP"]);
Щоб видалити певну властивість, просто встановіть для неї значення null.
            Hashtable setPlayerProperties = new Hashtable();
            setPlayerProperties.Add("PlayerHP", null);
            PhotonNetwork.LocalPlayer.SetCustomProperties(setPlayerProperties);
Додаткові посібники: